Stampr — Help & User Guide
Everything you need to know to get the most out of Stampr. This guide covers Stampr 2.0 for iPhone and iPad.
Contents
Getting Started
Stampr is a GPS field camera designed for professionals who need location-stamped photos and video with metadata. It burns GPS coordinates, altitude, bearing, street address, and optional voice notes directly onto your photos — and embeds the GPS data into the photo file itself (EXIF), so your shots pin correctly in Photos, GIS software, and claims tools.
The app has three tabs:
- Camera — Take GPS-stamped photos and videos with a live metadata overlay.
- Library — Browse, search, and organize your photos by project and tags.
- Settings — Customise the stamp format, toggle features, and manage your Pro purchase.
Grant Permissions
When you first open Stampr, allow access to your camera and location. Microphone access is needed only if you use voice notes or record video. You can change these anytime in iOS Settings.
Take Your First Photo
Point the camera and tap the shutter button. Stampr saves the photo immediately and stamps it with your GPS data, address, and timestamp — all frozen at the exact moment you pressed the shutter.
Add a Voice Note (Optional)
After each photo, hold the microphone button to record a voice note. Stampr transcribes it on-device, and on supported devices an on-device AI tidies the dictation into a clean caption with suggested tags. Prefer fully hands-free? Turn on Hands-Free mode in Settings and Stampr records automatically after every shot, stopping when you stop talking.
Review in Library
Switch to the Library tab to see all your stamped photos. Tap any photo for full details, metadata, and sharing options.
Using the Camera
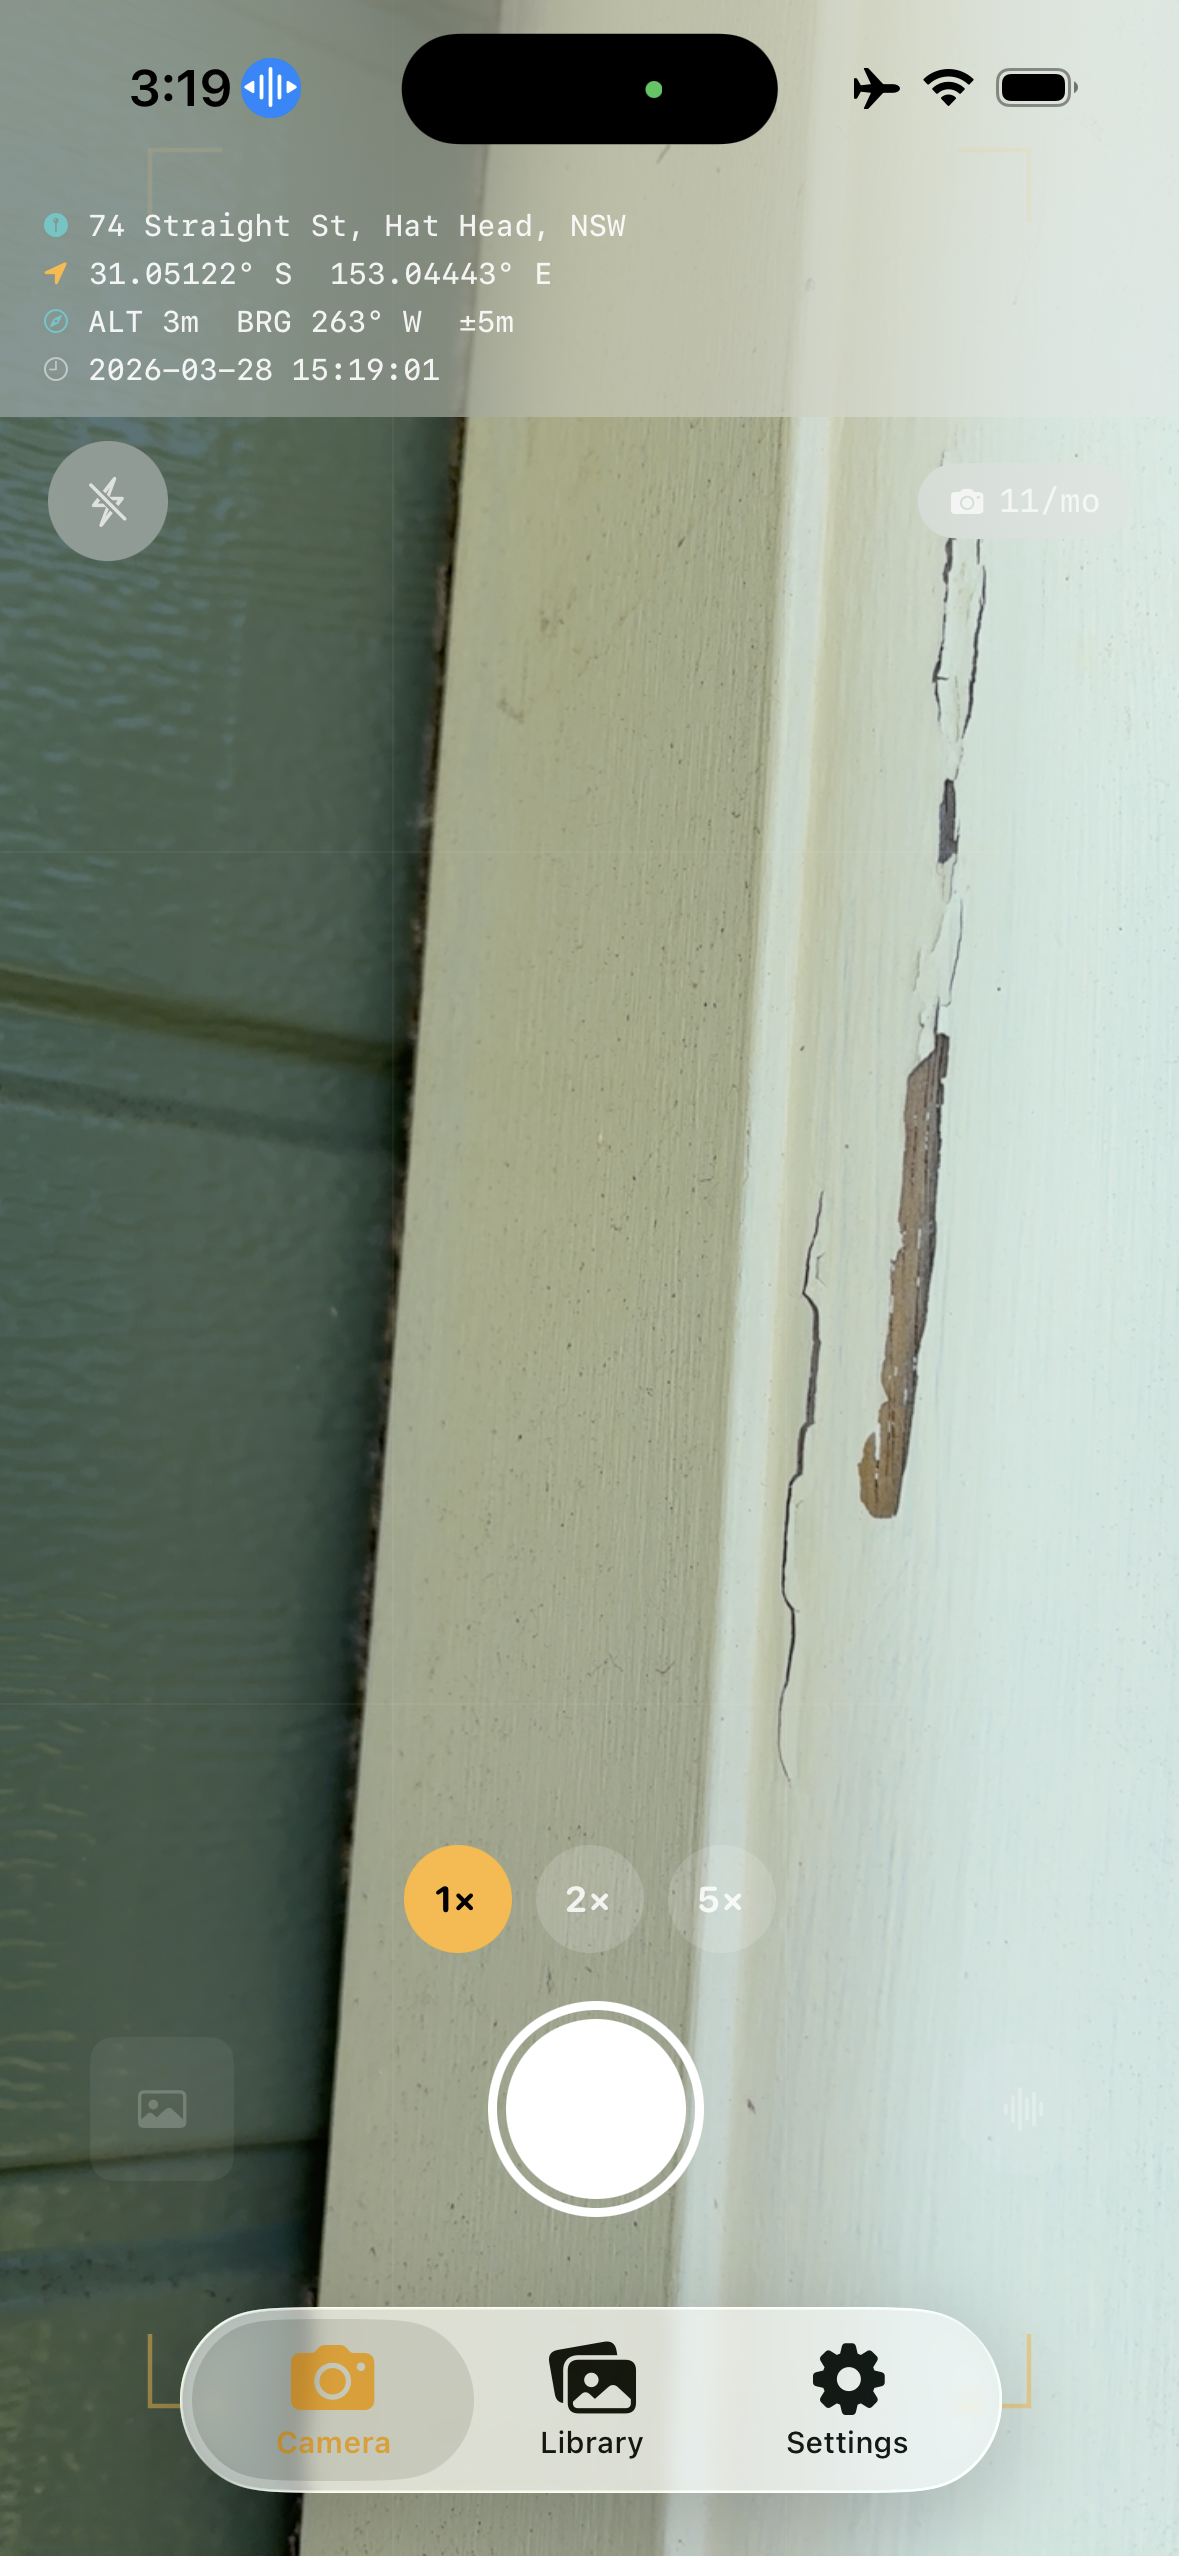
The Camera tab is where you take GPS-stamped photos and videos. The live stamp overlay at the top shows exactly what will be burned onto your image.
Stamp Overlay
The live GPS data is displayed at the top of the camera view. This is exactly what will be stamped onto your photo. It updates in real time as you move. The overlay shows:
- Street address (reverse-geocoded)
- GPS coordinates — in Decimal, DMS, UTM, or MGRS format
- Altitude (metres or feet), bearing (true or magnetic north), and accuracy
- Date and time
The accuracy readout is colour-coded: green within 5 m, amber within 15 m, red beyond that. If there's no GPS fix yet, the overlay shows "Acquiring GPS…" — and photos taken without a fix are stamped "NO GPS FIX" rather than misleading zero coordinates.
Photo / Video Mode
Switch between PHOTO and VIDEO with the mode picker above the shutter. See Stamped Video below for details.
Zoom & Lenses
Pinch to zoom or tap the preset buttons above the shutter. On iPhones with multiple rear cameras you also get a 0.5× ultra-wide preset, and zooming switches to the telephoto lens automatically for true optical quality — not just a digital crop.
Level Indicator
A subtle bubble level in the centre of the viewfinder shows when your horizon is straight — it turns green when you're level within 1.5°, in both portrait and landscape. Great for straight-on documentation shots. You can turn it off in Settings.
Require GPS Fix
If your work demands coordinates on every shot, enable Require GPS Fix in Settings. The shutter will then wait for a GPS lock, with a "Capture Anyway" escape hatch if you need the shot regardless.
Flash & Resolution
Tap the flash icon in the top-left corner to toggle the flash. Enable Maximum Resolution in Settings to capture at your iPhone's full sensor resolution (larger files).
Voice Notes & AI Cleanup
Voice notes add context that would be tedious to type — site conditions, observations, measurements, or instructions. Stampr transcribes them on-device and can burn the text directly onto the photo.
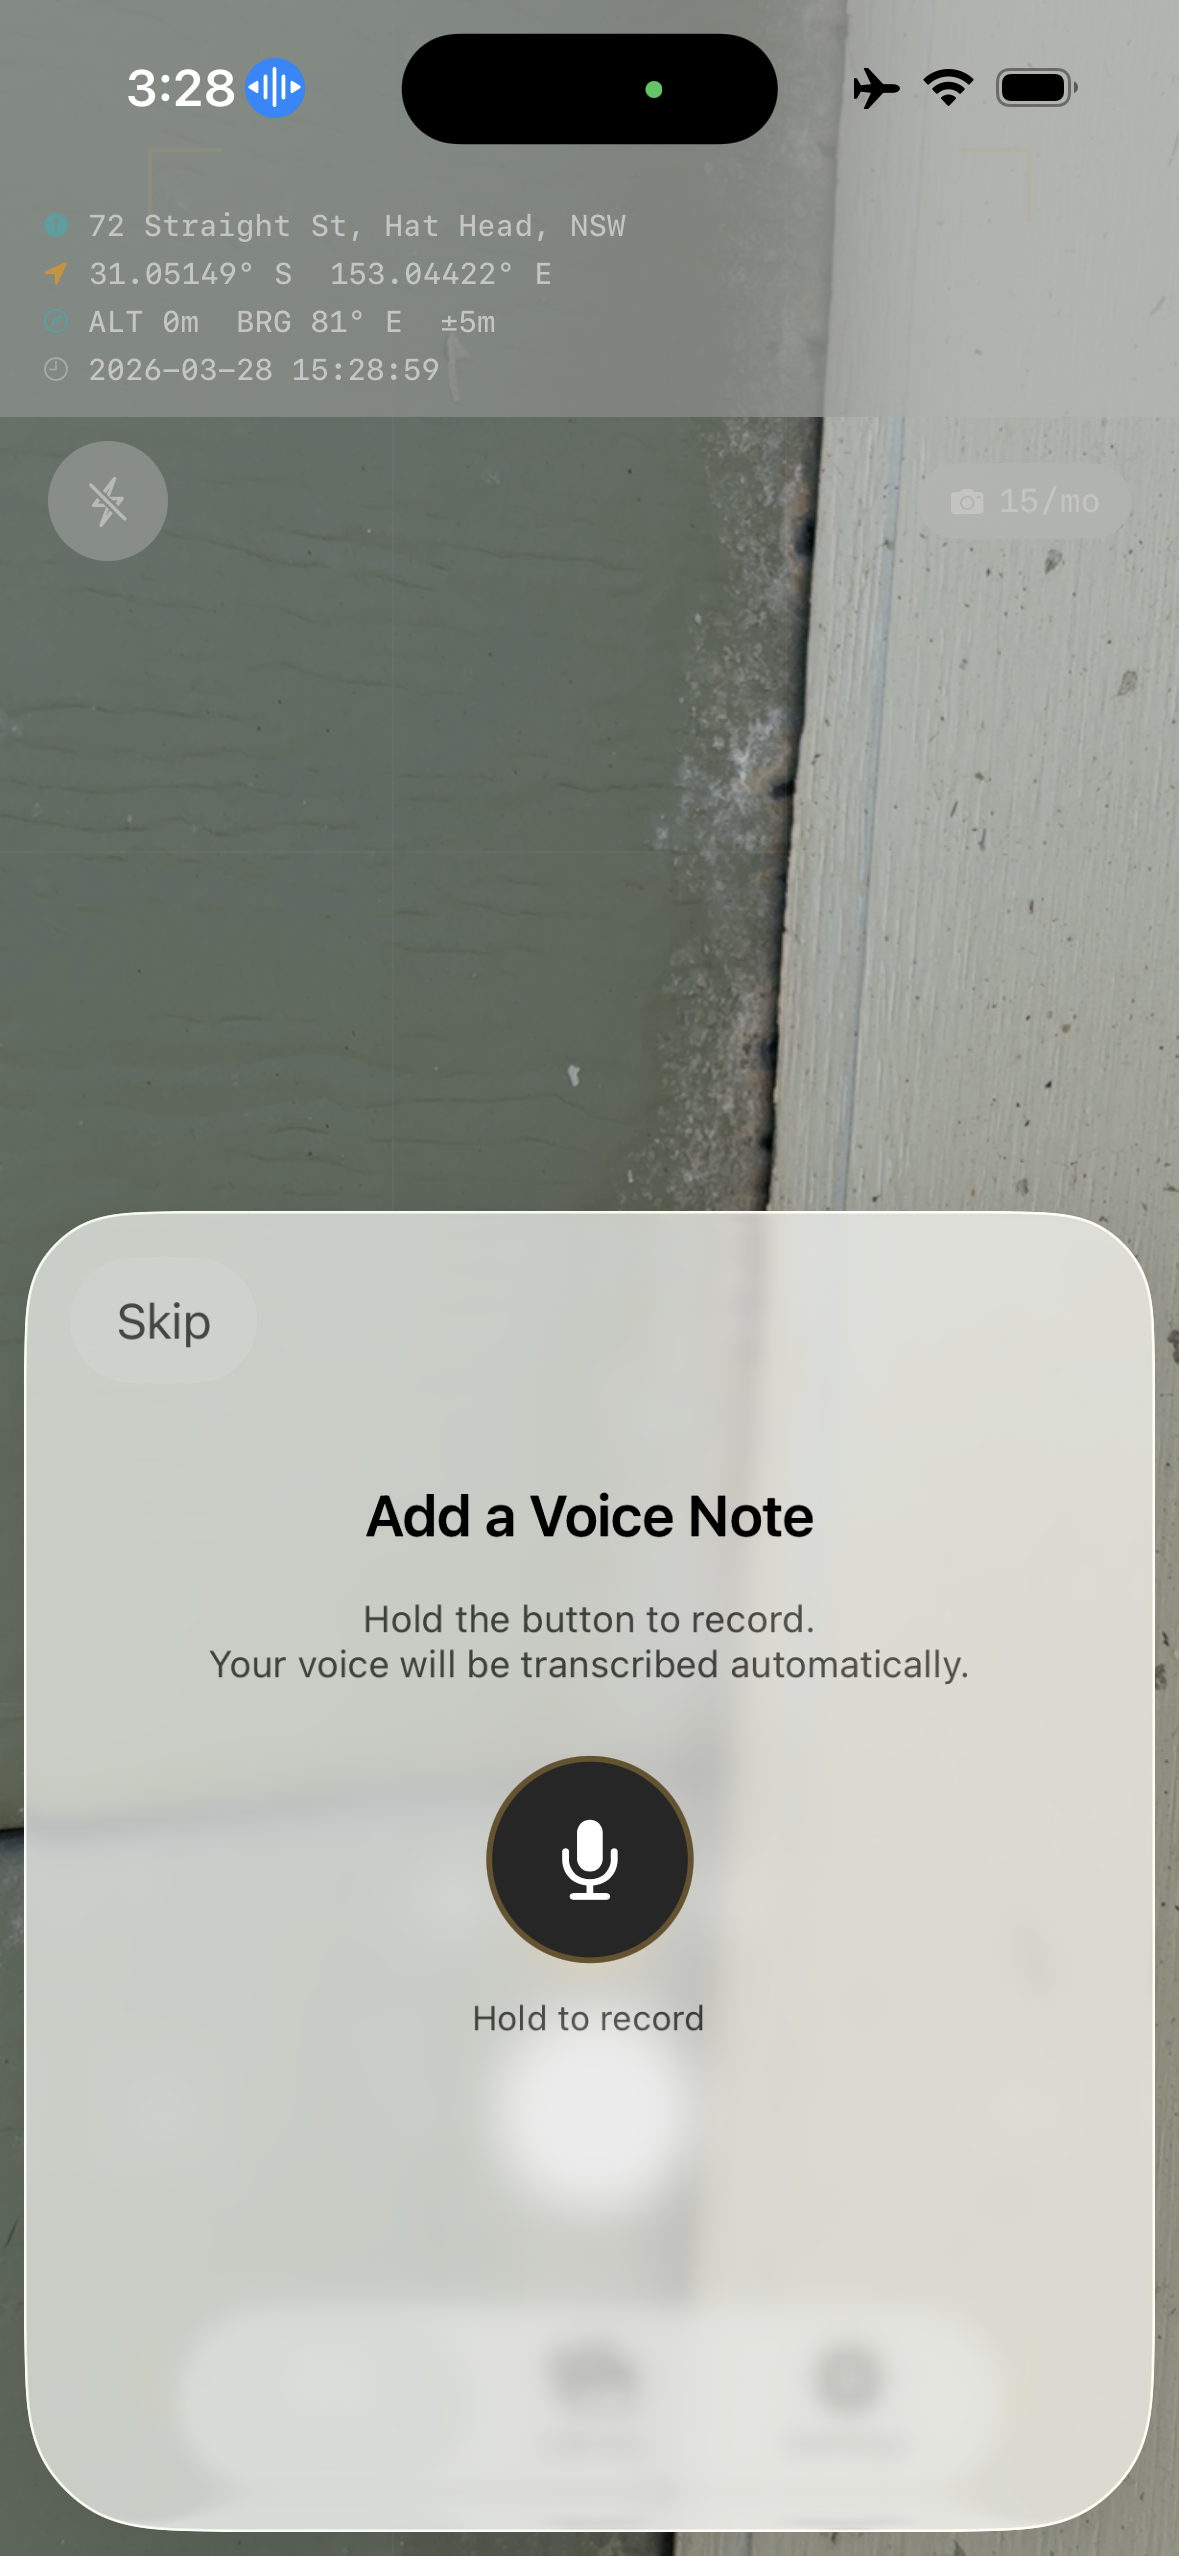
Three Voice Modes
Choose how voice notes work in Settings → Capture → Voice Notes:
- Prompt After Photo (default) — After each shot, a sheet appears. Hold the microphone button to record, release to stop.
- Hands-Free — Recording starts automatically after every shutter press and stops by itself about two seconds after you stop talking. From pocket to documented photo without touching the screen — ideal with gloves on.
- Off — No voice prompt. You can still add notes later from the photo detail screen.
AI Note Cleanup
On devices with Apple Intelligence, Stampr's AI Note Cleanup tidies your dictation into a clear, professional caption and suggests up to five searchable tags — entirely on-device. "um so there's a crack on the uh north wall" becomes "Crack on north wall." The verbatim transcript is always kept too: tap Show original transcript on any photo to see exactly what was said.
In the voice note sheet you can flip between the AI-cleaned version and the original before saving. On devices without Apple Intelligence, the verbatim transcription is used as-is.
Stamped Video
New in Stampr 2.0 — record site walkthroughs with the GPS stamp burned onto the footage.
Switch to VIDEO
Tap VIDEO in the mode picker above the shutter. The shutter button turns red.
Record
Tap to start recording (with sound), tap again to stop. Recordings cap at 3 minutes. The GPS data, address, and time are captured at the moment recording starts.
Stamped & Saved to Photos
Stampr burns the same stamp band your photos get — plus your watermark or logo — onto the video, then saves it straight to your Photos library. Look for the "Stamped video saved to Photos" confirmation.
Photo Library
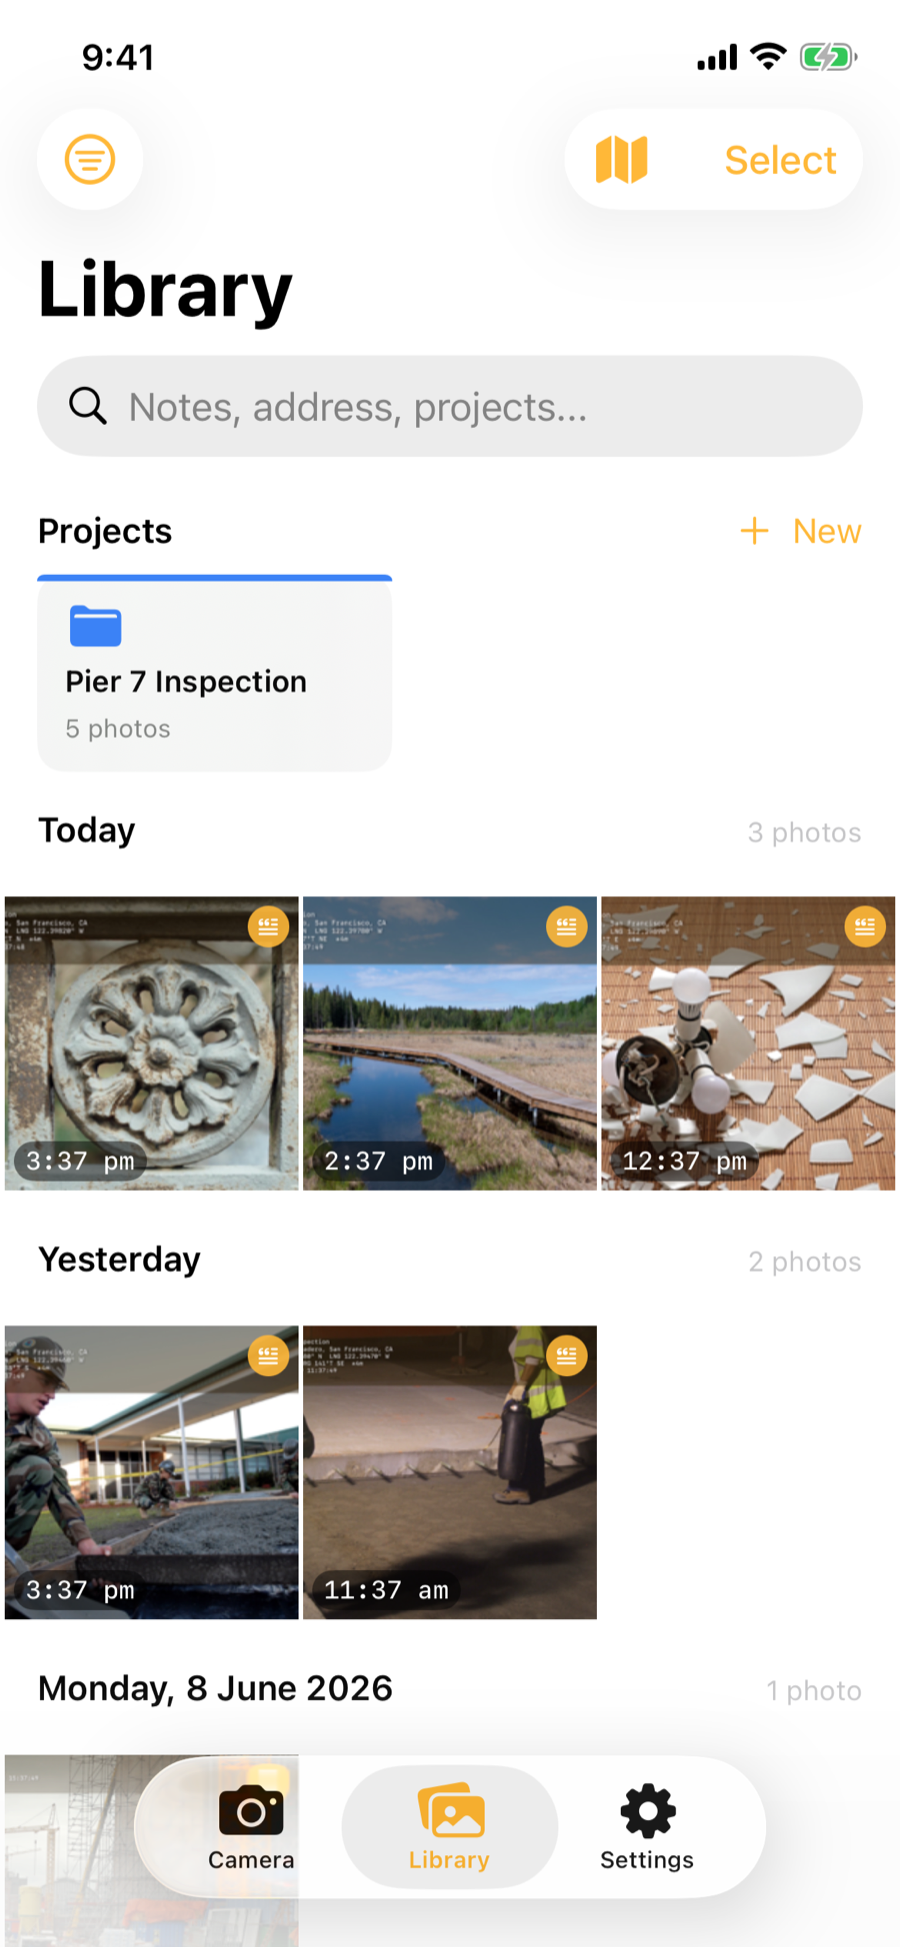
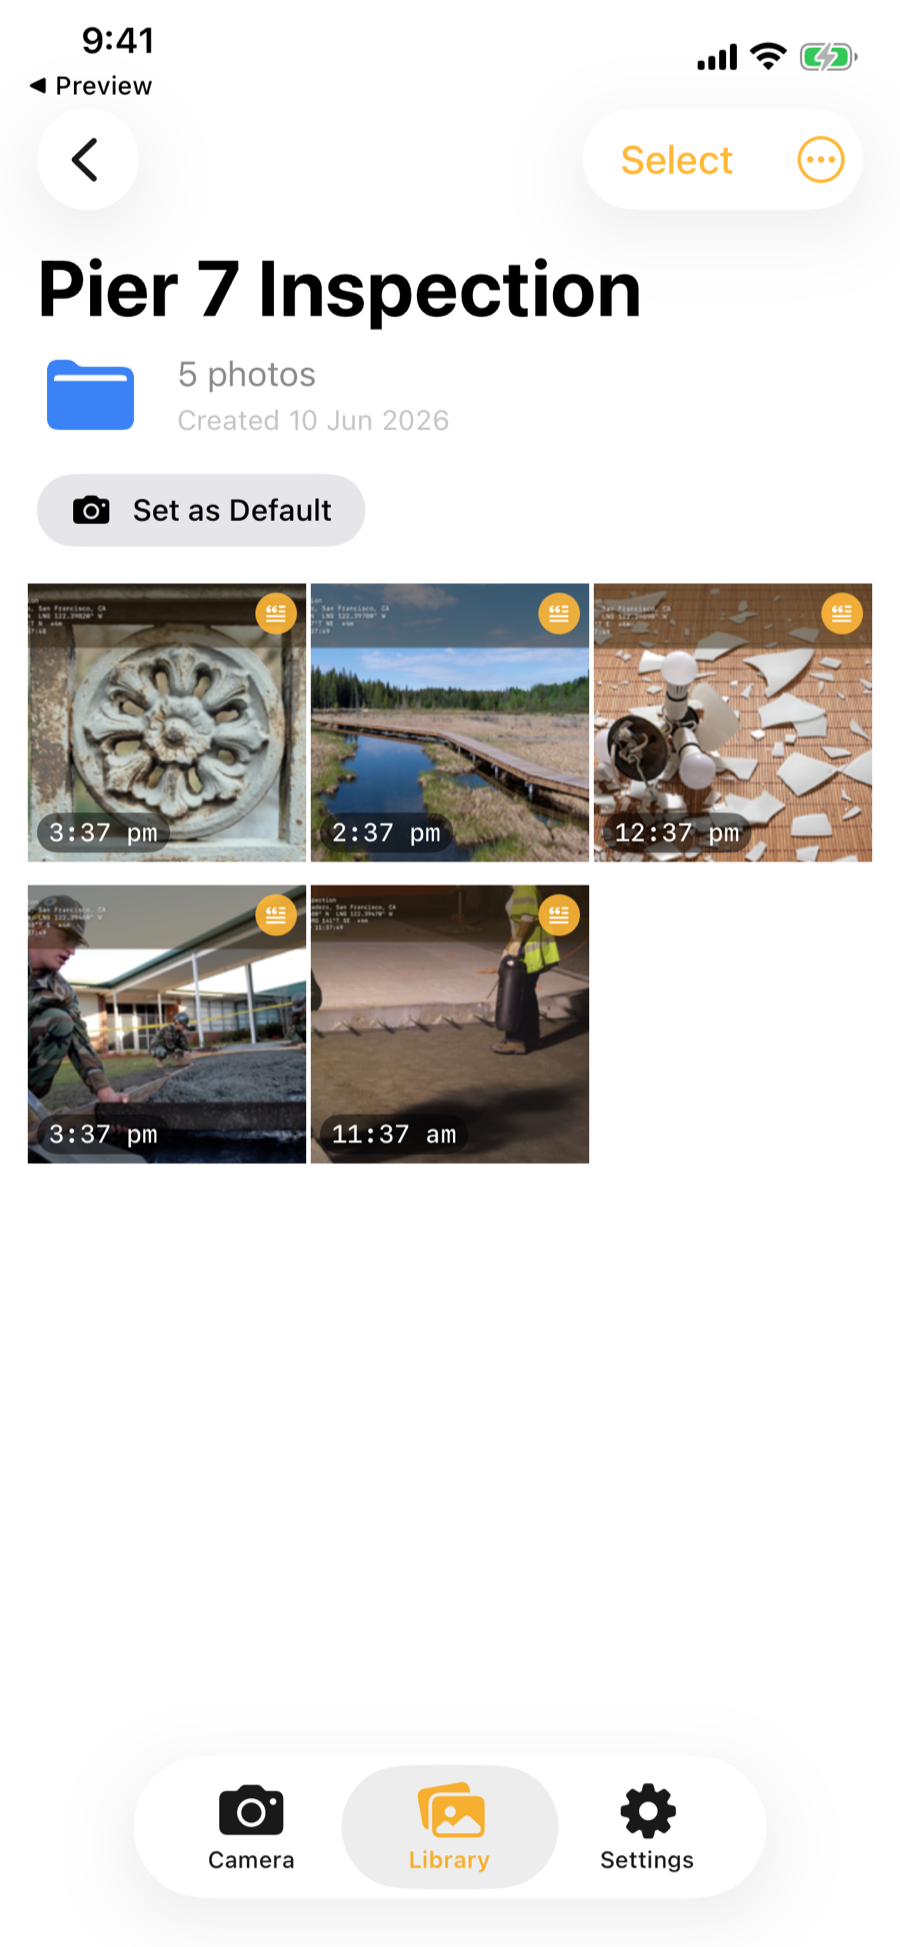
Browsing Photos
The Library tab shows all your photos in a grid sorted by date. Use the filter menu to narrow by time period, project, or tag. Use the search bar to find photos by notes (including the original transcript), tags, address, or project name.
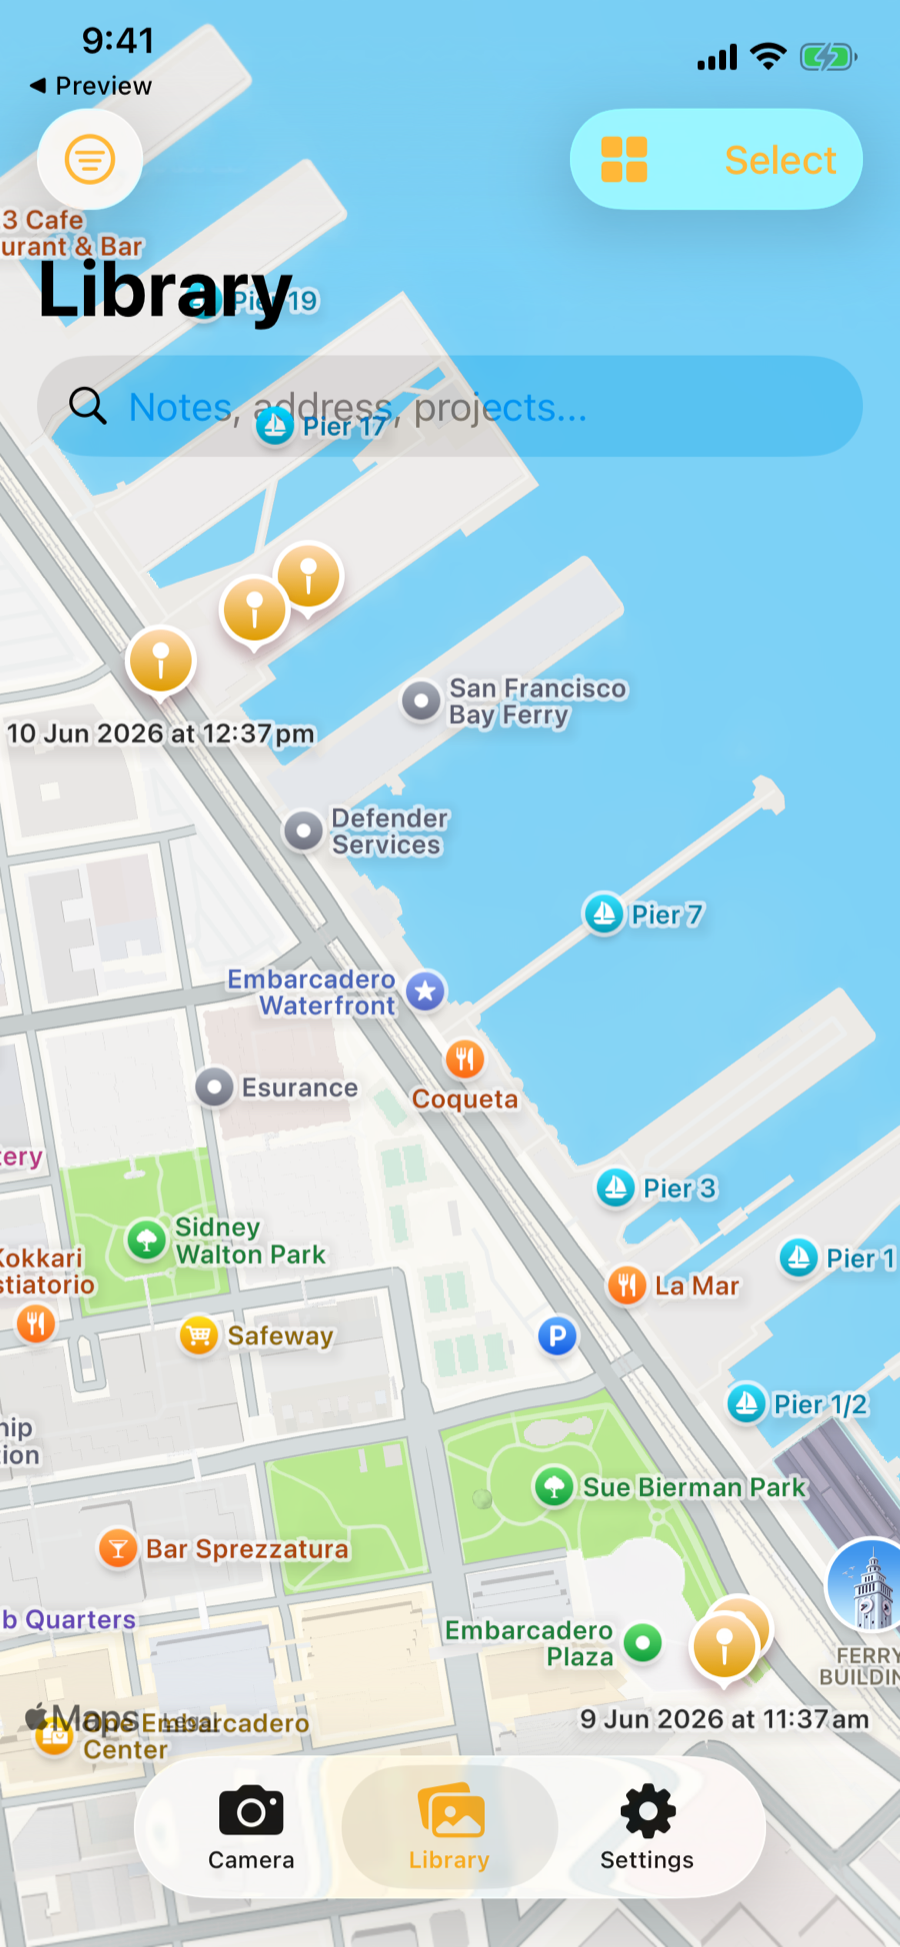
Map View
Toggle the map icon to see your photos plotted geographically. Tap any pin to open that photo's details. Only photos with valid GPS coordinates appear on the map.
Selecting Multiple Photos
Tap "Select" to enter selection mode. Tap photos to select them, then share or delete the selection using the toolbar at the bottom.
Photo Details
Tap any photo in the Library to see its full metadata. The detail view shows everything that was captured with the photo.
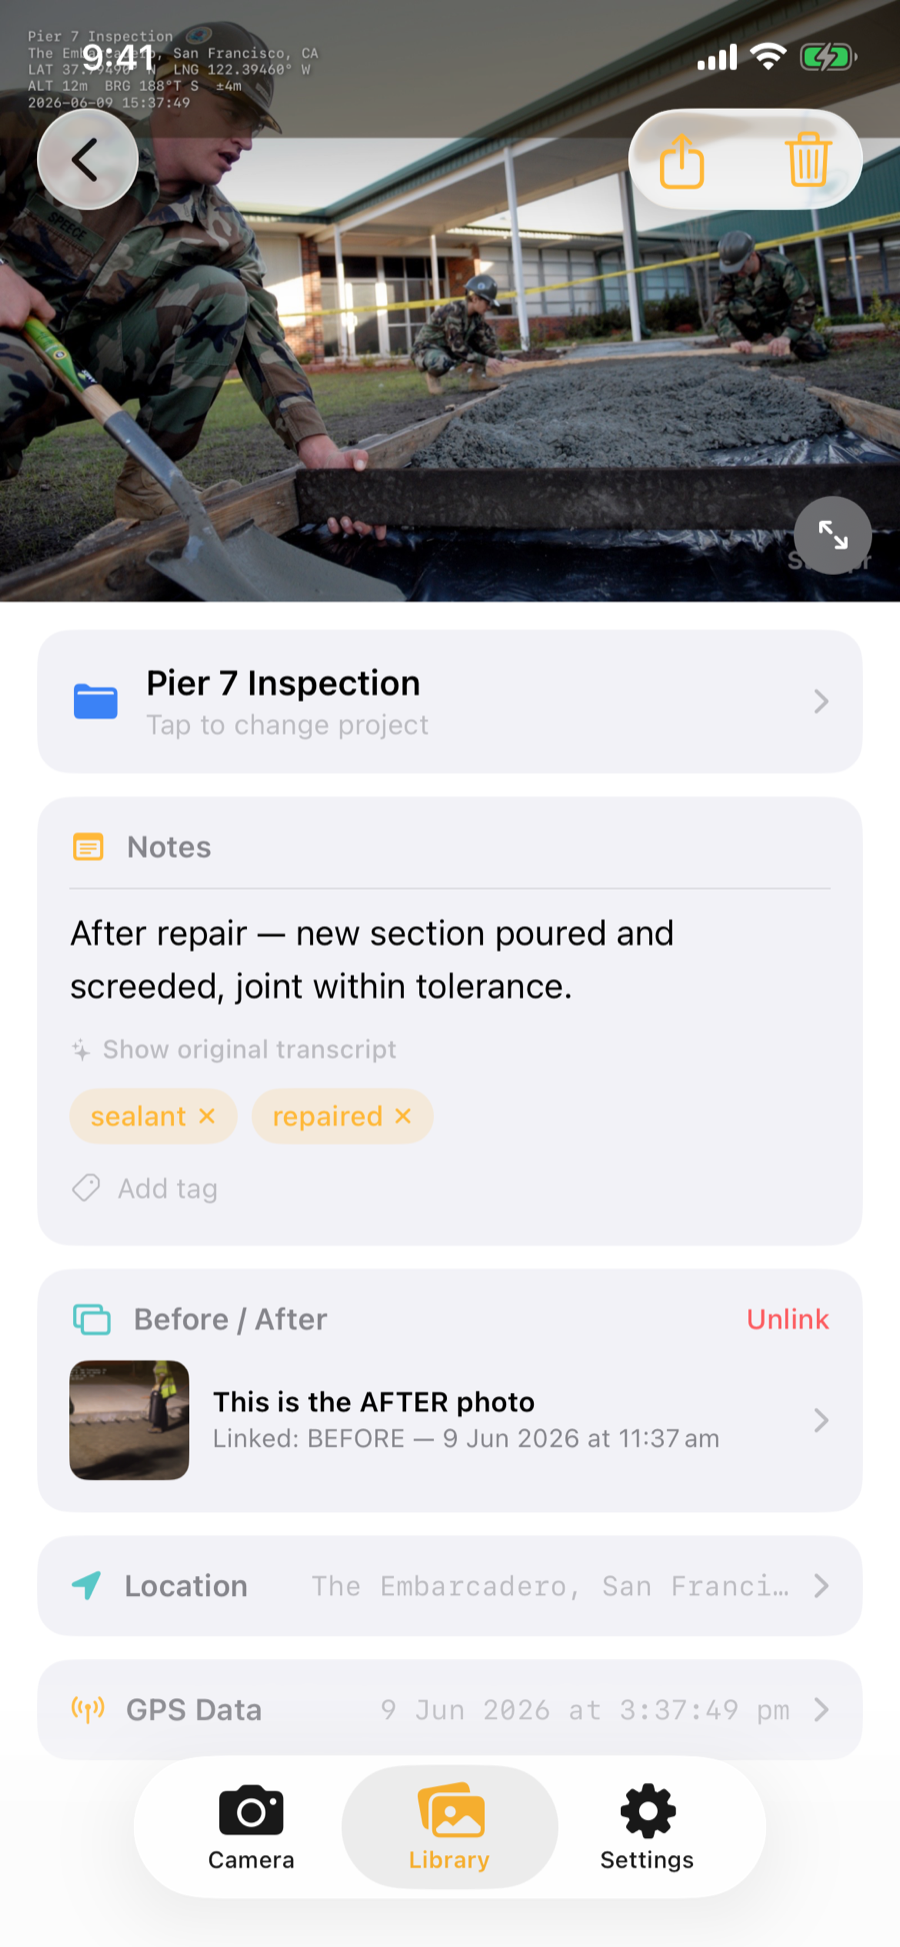
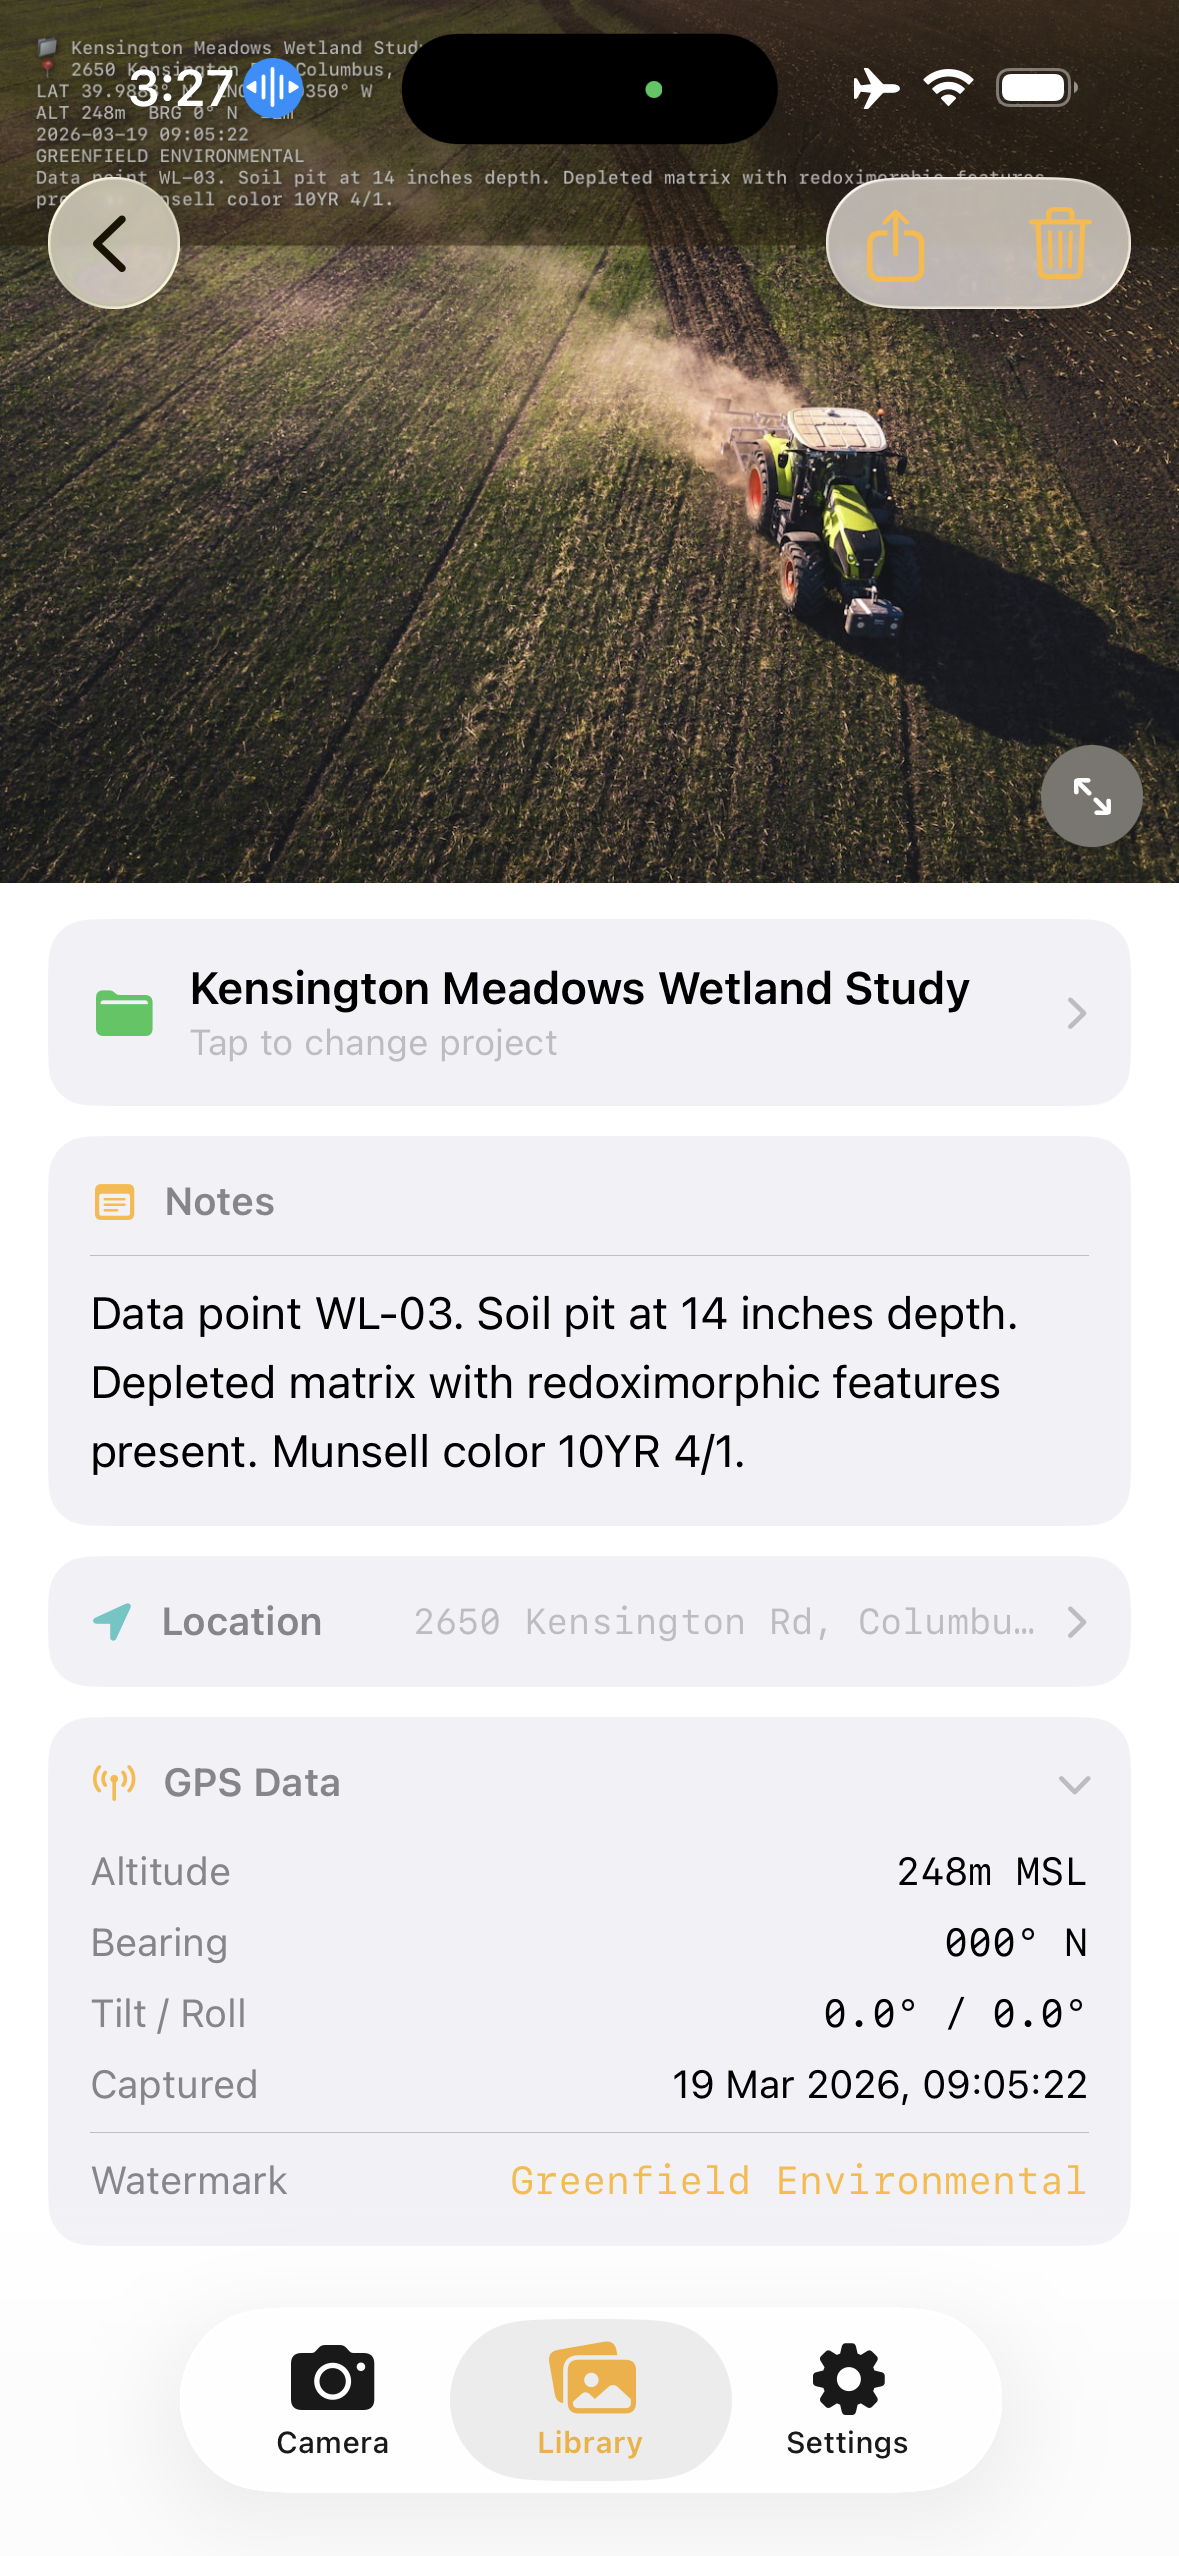
The detail view includes:
- Stamped photo — The full image with GPS data burned on; tap for fullscreen
- Project — Tap to change or assign a project
- Notes & tags — AI-cleaned caption (editable), the original transcript, and tag chips you can add or remove
- Before / After — Link this photo with another to document repairs; share the pair as a side-by-side composite
- Location — Interactive map, street address, coordinates, and the UTM reference
- GPS Data — Altitude, bearing, tilt/roll, accuracy, and capture time
Before / After Pairs
Tap Link Before/After Photo to pair two photos — the older one automatically becomes the "before". Once linked, the share menu gains Share Before/After, which exports a labelled side-by-side composite image. Perfect for documenting repairs.
Sharing One Photo
The share button offers Share Stamped Photo (with the PDF report), Share Original (the unstamped capture), and Share Before/After when the photo is paired.
Stamped Photo Example
Here is what a fully stamped photo looks like. The GPS data, address, project name, timestamp, and voice note transcription are all burned directly onto the image — and the same data is embedded invisibly in the file's EXIF metadata.
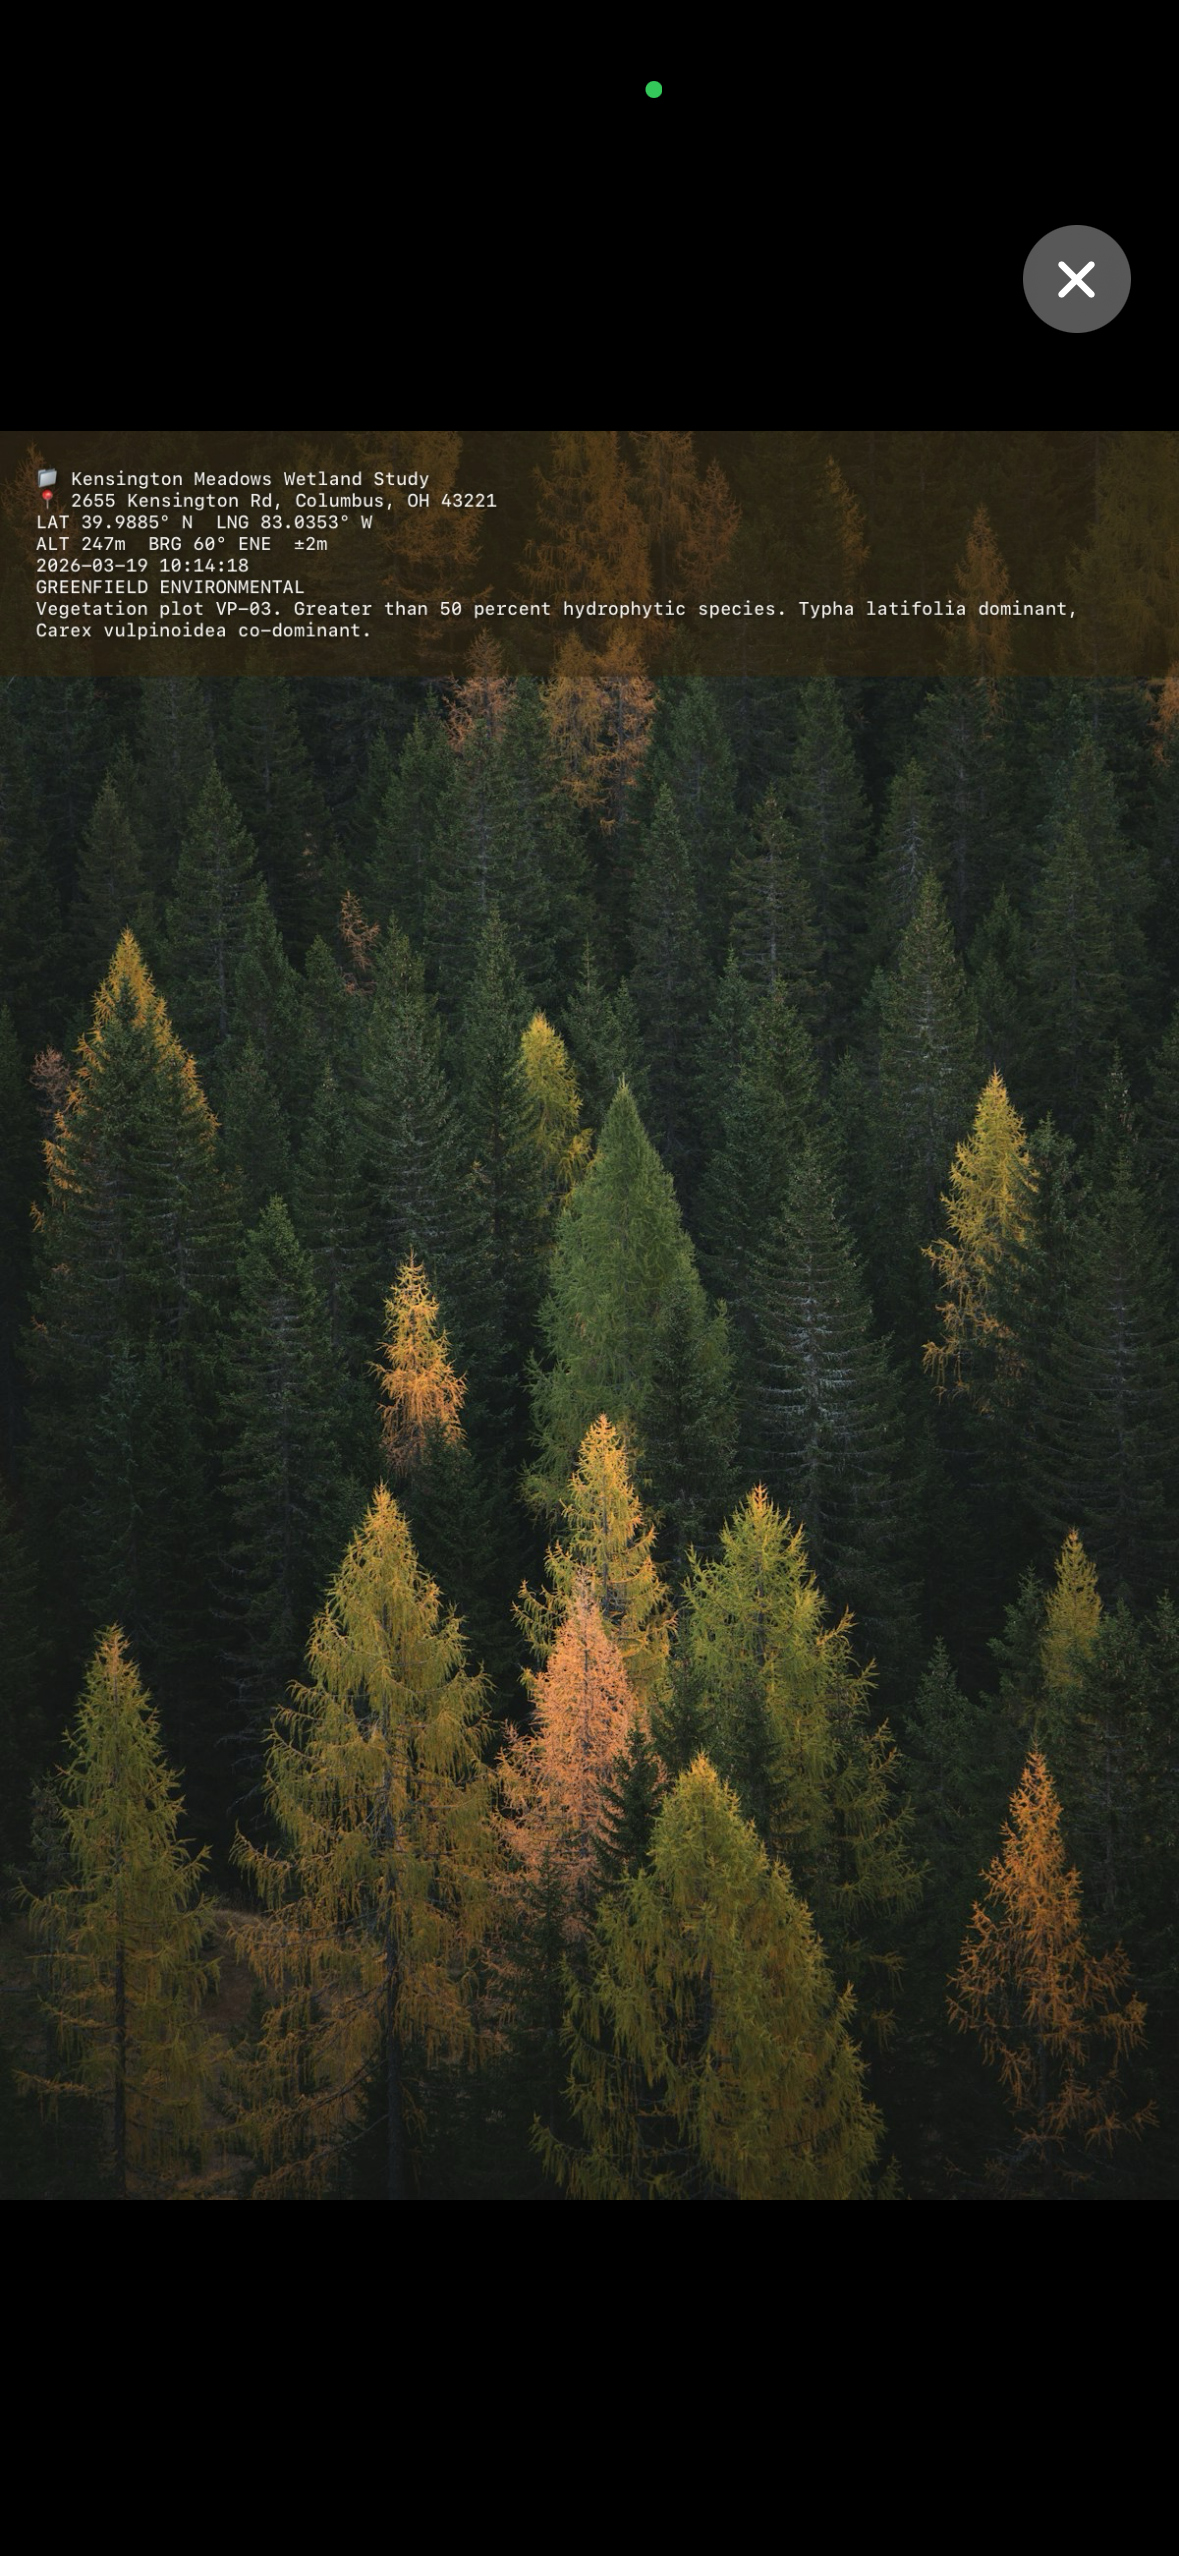
The stamp includes the project name, street address, GPS coordinates, altitude, bearing, date, watermark, and any voice note transcription — all configurable in Settings.
Projects
Projects help you organize photos by job site, inspection, or any grouping that makes sense for your work.
Creating a Project
In the Library tab, tap "+ New" next to the Projects row. Give it a name, pick a colour, and optionally set it as your default project.
Assigning Photos
From the photo detail screen, tap the project card to move a photo to a different project or remove it from a project. The stamp on the photo updates automatically to reflect the new project name.
Default Project
Set a default project so all new photos are automatically assigned to it. This is useful when you're on-site and want every photo tagged to the current job.
Renaming & Deleting
Open the project menu to rename or delete. After renaming, Stampr asks if you want to update the project name on all existing photos. When deleting, you can keep the photos unassigned or delete them too.
Sharing, Reports & Data Export
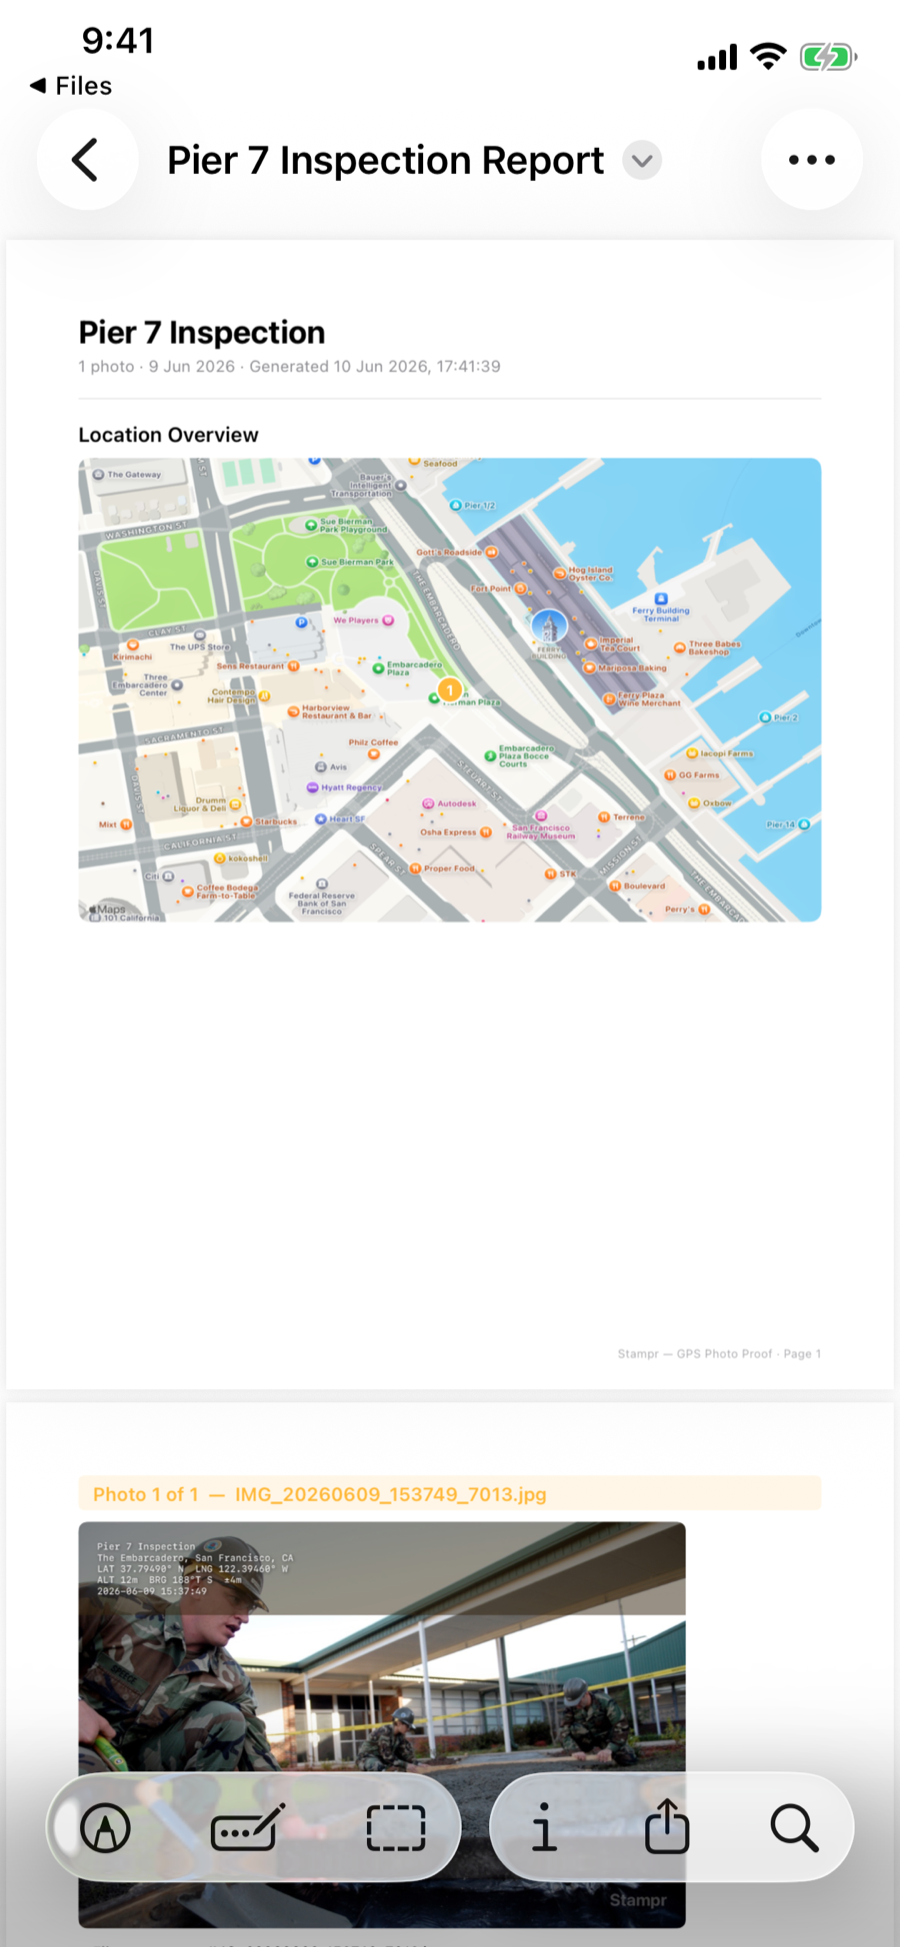
PDF Field Reports
When you share photos, Stampr attaches a professional PDF report — the document you hand to a client or claims assessor. The 2.0 report includes:
- A branded cover header (your logo appears here with Pro)
- A map overview page with numbered pins matching the photo list
- Every photo embedded at quality, with its full metadata table, notes, and tags
GPS in the Photo File (EXIF)
Every stamped photo also carries machine-readable GPS coordinates, altitude, bearing, and the capture time in its EXIF metadata. Shared photos pin correctly in Apple Photos, Google Earth, GIS packages, and insurance claims software. You can turn this off in Settings if you need location-free files.
Data Export — CSV, KML, GeoJSON
From any project's menu, choose Export Data to generate a spreadsheet-ready CSV, a KML file for Google Earth, or GeoJSON for GIS tools. Each row/placemark carries the filename, timestamp, coordinates, altitude, accuracy, bearing, address, notes, and tags.
Project Files — Team Handoff
New in 2.0: hand a whole project to a teammate as a single file — no accounts, no cloud service.
Share the Project File
Open the project, tap the menu, and choose Share Project File. Stampr packs every photo (stamped and original), voice note, and all metadata into one .stamprproj file you can AirDrop, message, or email.
Open on the Other Device
On the receiving iPhone or iPad, just tap the file — in AirDrop, Files, or Mail — and it opens straight into Stampr. (You can also use Import Project… in the Library's filter menu.)
Merge Without Duplicates
Importing merges by photo identity: photos you already have are skipped, new ones are added to the matching project. Trade files back and forth as a job progresses — you'll never get duplicates.
Settings & Customisation
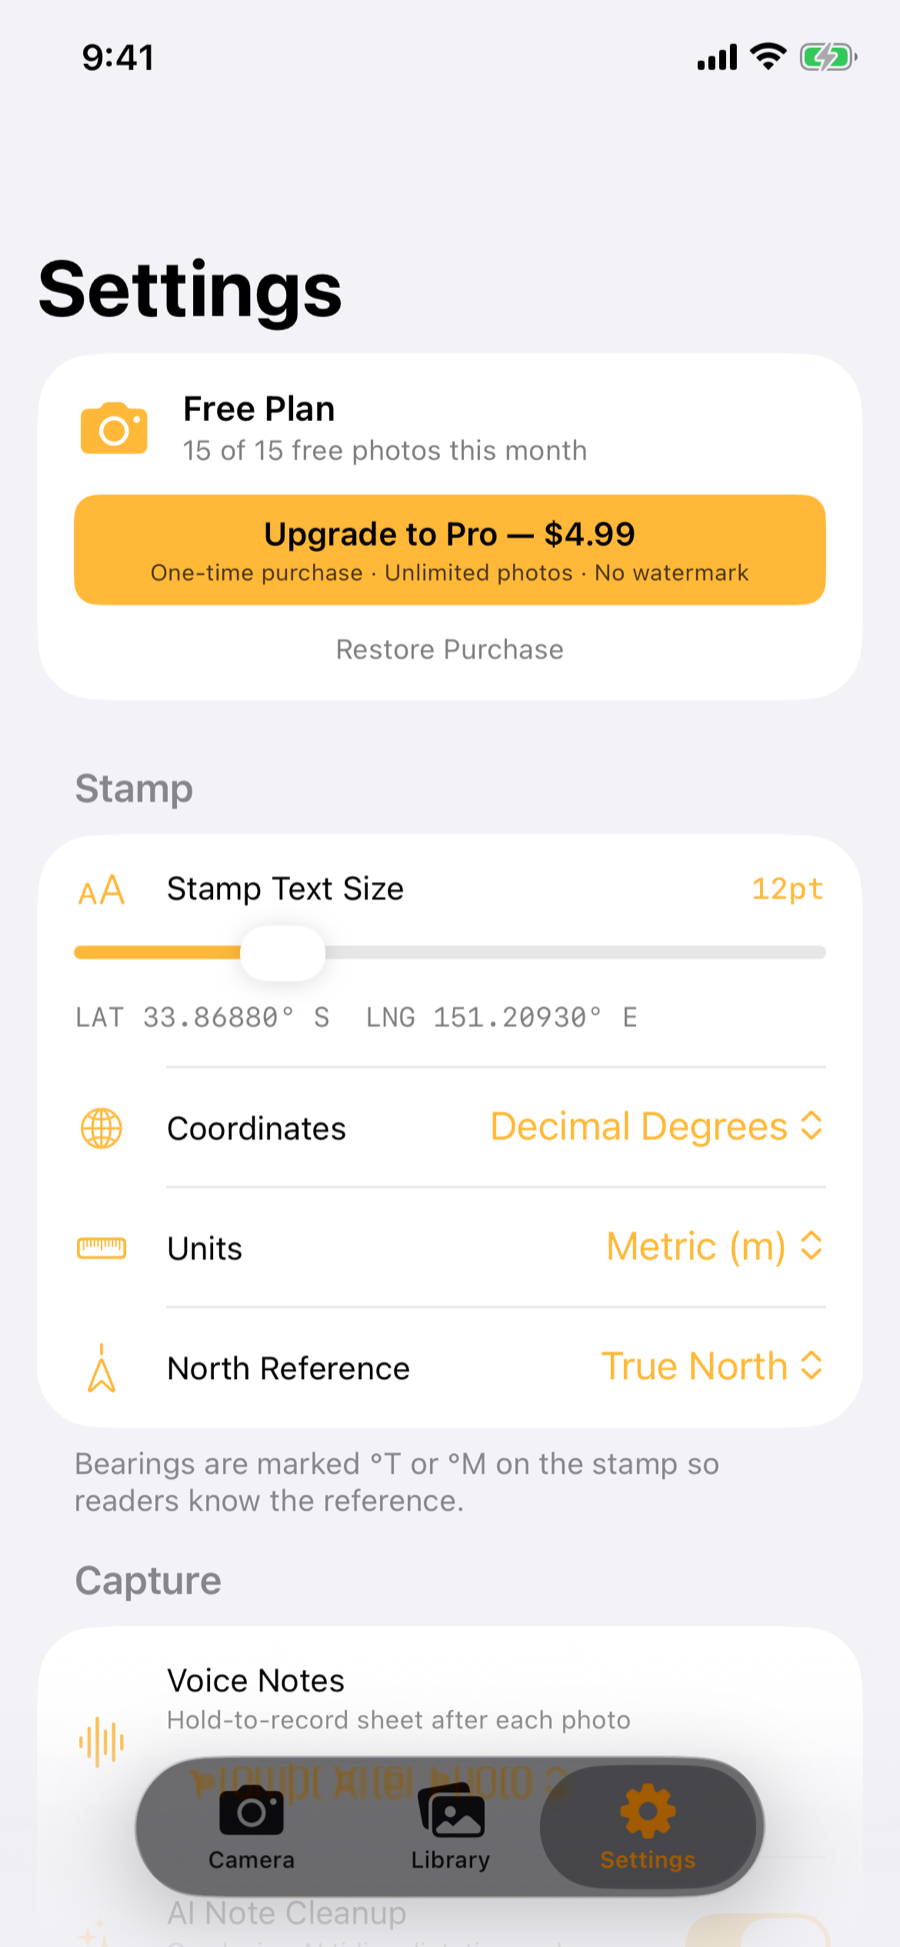
The Settings tab controls how Stampr stamps, captures, and shares.
| Setting | Description | Default |
|---|---|---|
| Stamp Text Size | Font size of the stamp overlay (8–24pt) | 12pt |
| Coordinates | Decimal Degrees, DMS, UTM, or MGRS | Decimal |
| Units | Metric (m) or Imperial (ft) for altitude and accuracy | Metric |
| North Reference | True or magnetic north — bearings are marked °T or °M | True |
| Voice Notes | Off, Prompt After Photo, or Hands-Free | Prompt |
| AI Note Cleanup | On-device AI tidies dictation and suggests tags | On* |
| Require GPS Fix | Block the shutter until coordinates are locked | Off |
| Maximum Resolution | Capture at the sensor's full resolution | Off |
| Level Indicator | Bubble level in the viewfinder | On |
| Print GPS on Photo | Include coordinates and altitude on the stamp | On |
| Print Address on Photo | Include street address on the stamp | On |
| Print Notes on Photo | Burns voice transcription onto the stamp | Off |
| Embed GPS in File (EXIF) | Machine-readable location inside the photo file | On |
| Auto-Save to Camera Roll | Save stamped photos to the Photos app too | Off |
| Include Report When Sharing | Attach the PDF report with map and photos | On |
| Watermark / Logo | Custom text or logo branding on photos and reports (Pro) | None |
| Location Services | Enable GPS, address, and compass data | On |
* AI Note Cleanup requires a device with Apple Intelligence; on other devices the verbatim transcription is used.
Stampr Pro
Stampr includes 15 free photos per month. To unlock unlimited photos and remove the watermark, purchase Stampr Pro — a one-time payment with no subscription.
Restoring Your Purchase
If you reinstall the app or switch devices, go to Settings and tap "Restore Purchase". Your Pro access will be restored automatically via the App Store. Make sure you're signed into the same Apple ID you used for the original purchase.
Shortcuts & Search
Action Button & Siri
Stampr provides a Take Stamped Photo action you can assign to the Action button (iPhone 15 Pro and later) or trigger with Siri — from pocket to a stamped capture in one press. It also works in the Shortcuts app for custom automations.
Spotlight
Your photo notes, addresses, and tags are indexed in iOS Spotlight search. Swipe down on your home screen, search a phrase from a note, and tap the result to jump straight to that photo in Stampr.
iPad
Stampr 2.0 runs natively on iPad with a layout built for the larger screen — the same library, projects, reports, and project-file import.
Permissions
Camera
Required to take photos and videos. If access was declined, the viewfinder shows a shortcut to enable it in iOS Settings.
Location
Used to stamp GPS coordinates, altitude, bearing, and street address onto photos. You can disable this in Settings if you don't need location data.
Microphone
Needed for voice notes and video sound. Only used while recording. You can disable voice recording in Settings.
Speech Recognition
Used to transcribe voice notes into text on-device. Your audio is not sent to external servers.
Photo Library (Add)
Required for "Auto-Save to Camera Roll" and for saving stamped videos to your Photos library.
Frequently Asked Questions
Where are my photos stored?
Do my photos sync between my iPhone and iPad?
Can I change the stamp after taking a photo?
What does the AI Note Cleanup need?
Does Stampr send my location data anywhere?
What are UTM and MGRS formats?
Why is the address not showing?
Can I use Stampr offline?
How do I share photos with the GPS report?
Hands-free mode stops too early (or too late) on a noisy site
My video saved without a stamp / I can't find my video
I purchased Pro but it's not showing. What do I do?
Is my voice recording data sent to Apple or any server?
Still need help?
Email us at support@top7systems.net and we'll get back to you within 48 hours.